Techniques
How to Sear a Steak With a Restaurant-Quality Crust
Most home cooks have eaten a great sear at a restaurant and then spent years wondering why theirs looks pale and steamed by comparison. The answer is almost never the steak itself — it's the setup before it hits the pan.
The pan matters more than almost anything else
A nonstick pan won't get you a proper crust. The coating degrades at the temperatures you need, and the surface doesn't hold heat the same way. For searing, you want cast iron or stainless steel — ideally something heavy that stays hot when cold meat lands on it.
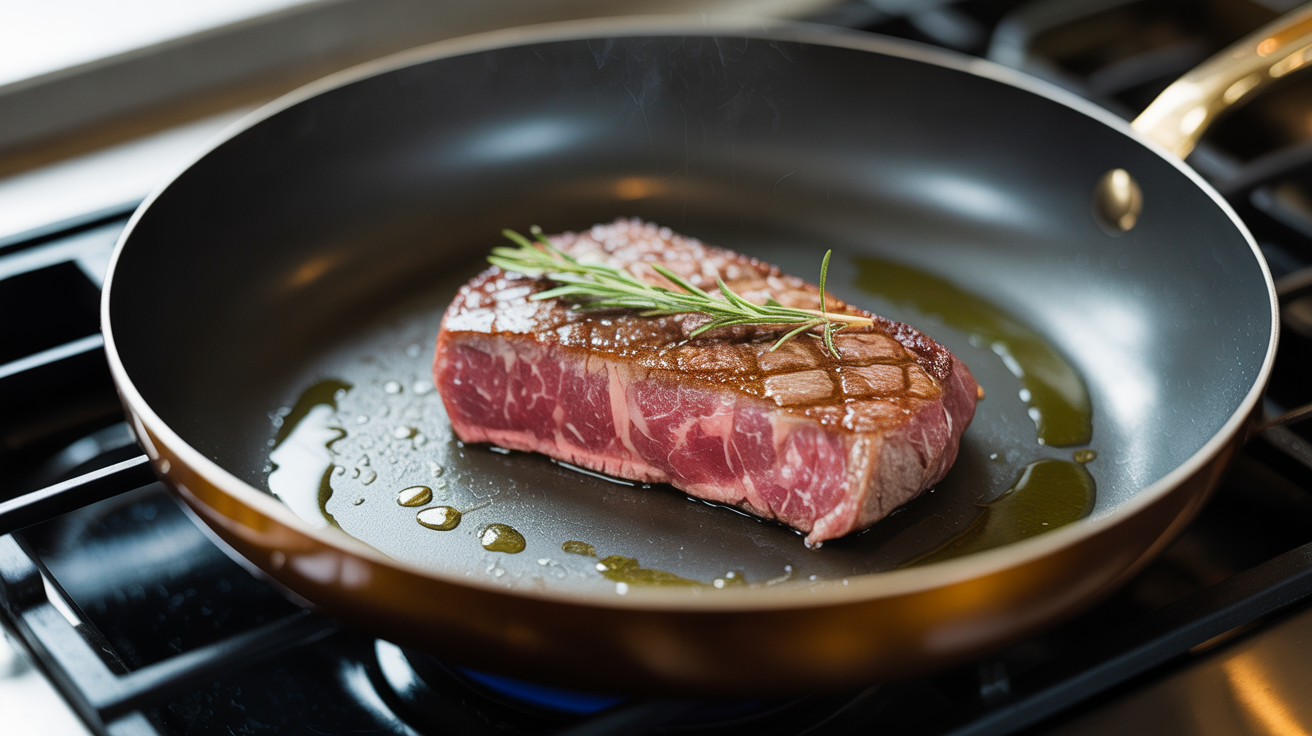
Cast iron is forgiving. It holds heat well and distributes it evenly once it's up to temperature. Stainless works too, and it's easier to see the fond developing, which helps you judge color. Either way, the pan needs to be genuinely hot before the steak goes in — not medium-hot, not "I can hold my hand over it" hot. If a drop of water evaporates immediately on contact, you're close. If it beads and skitters around, you're there.
Why you'll skip nonstick forever after this
Nonstick pans are built for eggs and pancakes. They rely on a coating that breaks down above roughly 450°F, which is below the temperature you need for a real Maillard reaction on beef. You'll get a gray, soft surface instead of a crust. More importantly, PTFE fumes at high heat are not something you want in your kitchen. Use the right tool.
Dry brining: the step most people skip
Dry brining means salting the steak and leaving it uncovered in the fridge for at least an hour, and ideally overnight. The salt draws moisture out of the surface, then that moisture dissolves the salt and gets reabsorbed — taking flavor with it into the meat.
More relevant to searing: that surface moisture has to evaporate before you'll get a crust. The longer the steak dries in the fridge, the drier the exterior when it hits the pan. A steak pulled straight from the package and thrown into the pan is fighting an uphill battle — all that surface water turns to steam first, and steam is the enemy of browning.
Salt generously — about half a teaspoon of kosher salt per side for a one-inch ribeye. Set it on a wire rack over a sheet pan so air circulates underneath. Then leave it alone.
Pat it dry right before searing
Even after a night in the fridge, pat the steak with paper towels right before it goes into the pan. There's always some residual moisture. This takes five seconds and it matters.
Oil choice and smoke points
You want an oil with a high smoke point. Avocado oil, refined grapeseed oil, and refined sunflower oil all work well — smoke points around 450-500°F. Butter is not the right oil for the initial sear because it burns. You'll add butter later for basting.
Use only enough oil to coat the pan in a thin film. Pour it in just before the steak goes in. If the oil starts smoking heavily before you've added the steak, the pan is at a good temperature. Add the steak immediately.
Some cooks brush the oil directly onto the steak instead of putting it in the pan. That works too, and it uses less oil overall.
The actual sear
Don't move it
This is where most home cooks go wrong. They put the steak in the pan and then keep checking it, poking it, shifting it slightly. Every time you move the steak, you break the contact between meat and pan and the crust stops forming.
Put the steak in, press it down gently with a spatula for two or three seconds to ensure full contact, and then leave it alone. For a one-inch steak at high heat, you're looking at about three to four minutes per side before flipping.
You'll know it's ready to flip when the steak releases cleanly from the pan. If it's sticking, it's not ready. This is almost always true — a proper sear forms a crust that lets go when it's done.
Basting with butter
Once you flip the steak, this is when butter goes in. Add two tablespoons of unsalted butter, two or three crushed garlic cloves (still in their skin is fine), and a sprig of thyme or rosemary if you have it.
Tilt the pan slightly and use a spoon to continuously baste the top of the steak with the foaming butter. This adds flavor and helps the top surface cook while the bottom forms its crust. Do this continuously for the last minute or two of cooking.
For thicker cuts, you can sear all four sides — both flat faces and both edges — before basting. This builds crust on the entire exterior.
Doneness temperatures
The only reliable way to know when a steak is done is with a thermometer. Press tests and timing are too variable — thickness, starting temperature, and pan heat all change the math.
| Doneness | Pull temp | Final temp (after rest) |
|---|---|---|
| Rare | 120°F | 125°F |
| Medium rare | 125°F | 130°F |
| Medium | 135°F | 140°F |
| Medium well | 145°F | 150°F |
| Well done | 155°F | 160°F |
Pull the steak a few degrees before your target because the internal temperature keeps rising while it rests — this is called carryover cooking. For most cuts, that's a 5°F rise.
Insert the thermometer probe into the thickest part of the steak horizontally, not from the top. You want the tip of the probe at the center.
Resting
Resting isn't optional. The muscle fibers in cooked beef contract and push moisture toward the center. If you cut immediately, that juice runs out onto the board. If you rest the steak, those fibers relax and reabsorb some of it.
For a one-inch steak, five minutes is enough. For something like a two-inch tomahawk, ten minutes. Don't tent it tightly with foil — that traps steam and softens the crust you just worked for. Loose foil, or just set it on a warm plate.
While the steak rests, you can use the pan drippings and fond to make a quick pan sauce, or just serve the butter-garlic mixture from basting spooned over the top.
Common mistakes and what to fix
The steak steamed instead of searing. This means the pan wasn't hot enough, the steak was wet, or both. Next time: preheat longer, pat drier, don't crowd the pan.
The crust burned before the inside cooked. This usually means the heat was too high for the thickness. For steaks thicker than 1.5 inches, sear at high heat first to build the crust, then finish in a 375°F oven until the internal temp is where you want it.
The steak stuck and tore when you tried to flip it. It wasn't ready. Give it another minute. A properly seared crust releases on its own.
The outside looks great but the inside is gray and overcooked near the edges. The pan was too hot, or you cooked it too long. This is the tradeoff with very high heat on thicker cuts — the oven-finish method above solves it, or look into reverse searing, which starts the steak in a low oven and finishes with a hot sear.
Frequently Asked Questions
Can I sear a steak from frozen?
Yes, and it's actually a reasonable technique for thin steaks. Frozen meat loses less moisture during cooking because the surface takes longer to heat through. Sear from frozen at high heat, adding a minute or two per side. Check the internal temperature — don't guess. This works better for strip steaks and ribeyes than for thicker cuts.
Does the type of steak affect how I sear it?
The method is the same, but thickness and fat content change the timing. A thin skirt steak needs 90 seconds per side at screaming-hot heat. A thick ribeye might need the pan-to-oven approach. Fattier cuts like ribeye baste themselves a bit as they cook. Leaner cuts like sirloin need more attention to avoid drying out.
What if I don't have a cast iron pan?
A heavy stainless skillet works well. Avoid thin pans — they lose heat too fast when the cold steak hits them, which is exactly what causes the gray steamed exterior. If your stainless pan has a disk bottom rather than a fully clad construction, preheat it longer to let the bottom fully saturate with heat.
Can I use the same searing technique for other proteins?
The fundamentals carry over: dry surface, hot pan, high-smoke-point oil, don't move it. Chicken thighs, pork chops, salmon skin-side down — all benefit from the same approach. The how to roast vegetables post covers a related concept: surface moisture is the enemy of good browning whether you're using a pan or an oven. If you've cooked rice in the same meal and your burner is occupied, a cast iron pan holds heat well enough that you can pull it off the flame for a minute without losing the sear. See how to cook rice for timing that lets you manage both at once. For sides that complement steak well, how to caramelize onions is worth a look — the low-and-slow method frees up your attention while the steak does its resting time.